It’s nearing that time of year when the gift purchasing frenzy starts. Some will be big gifts, some smaller, none any less important. Our main motivation behind our affordable Barbless Circle Hook Wrap Bracelet was to raise awareness about fishing practices, and to donate a bit to help monk seals, honu and little sharks. But our other motivation was to provide an offering that ocean lovers with all level of incomes could have and love. The bracelets are not sold in stores, just in our booth at shows and online in the shop, which means there is no middle man and we are able to donate a percentage to marine life conservation.
For a truly special gift, you can choose what beads you want and we’ll make a custom bracelet. But perhaps you have some beads that have special meaning, and you want to add them yourself? Then this post is for you! Read on below.


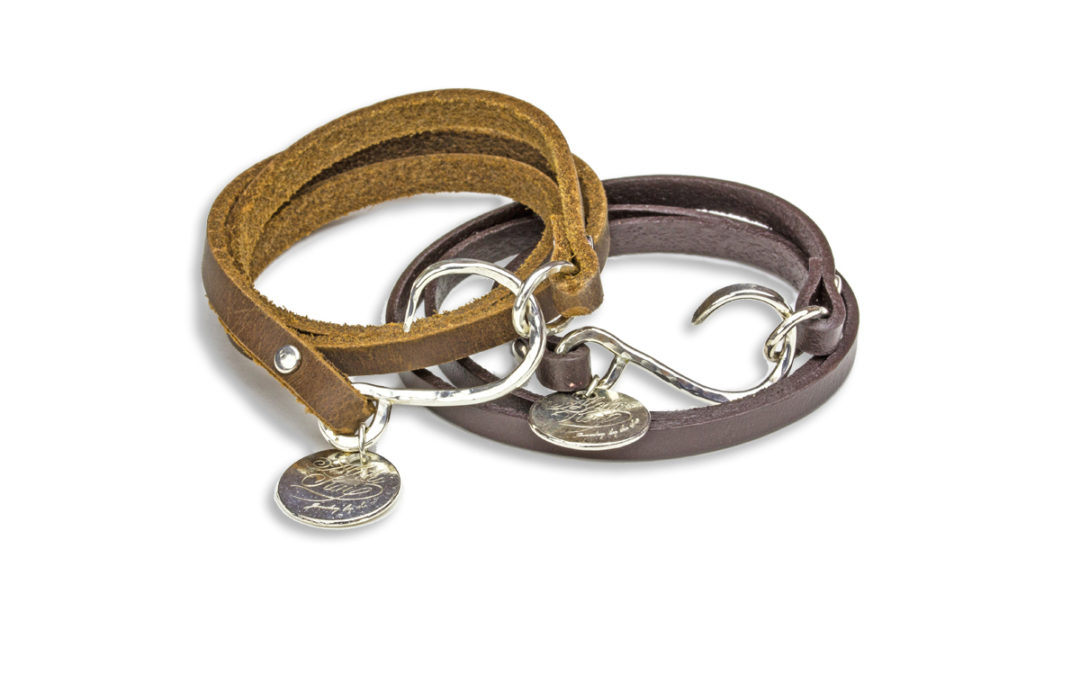
Since we introduced our sterling silver Barbless Circle Hook Bracelets (BCH) they’ve proven to be one of our most sought after items. More than just jewelry, they symbolise a sense of stewardship and responsibility for how we treat marine life. Ocean lovers, sports lovers, fishermen, we’ve had all kinds of people from the world over falling in love with the easy look and comfortable fit of the BCH bracelets. The wrap materials are soft and durable, while the clasp is solid, hand-worked Argentium sterling. Quality and simplicity for people who care about the sea.
The Bracelets
We now have two colors of the ever popular 5mm bracelets (above left) – sturdy cowhide that softens and ages beautifully. (We used to call them ‘men’s’, but as both men and women love them, ‘5mm cowhide’ seems better)
We also have the 3mm bracelets (above right and right) in 4 colors of soft deerskin and 2 colors of vegan microfibre. These can all be customised with your choice of gemstones, recycled glass or czech glass (examples below). At shows we usually have a ‘dangles bar’ where you can choose your own dangles and we’ll make your bracelet for you on the spot. Someone recently asked if we do home parties with the dangles bar – if you like that idea, just contact us. Any of our BCH bracelets can be further customised with a heart clasp too.


Another thing we’ve found is that both men and women who have smaller wrists are elated when they realise we can customise the fit – its hard to find bracelets that fit smaller wrists!
Of course we’re happy to make custom bracelets, but if you already have some beads with special meaning for you, you can make your own too! See below for a tutorial on how to wire wrap your own beads to put on the bracelet. All you need are a set of jewelry pliers, wire-wrapped beads and some jump rings.
How to Wire Wrap a Bead

You will need:
- head pins (here, sterling silver 1.25″ headpins)
- beads
- chain nose pliers
- round nose pliers
- bent nose pliers
- wire clippers

Insert a bead onto a headpin, and using the chain nosed pliers, bend over the long end of the wire to form a 90 degree angle. Make sure you leave a bit of room between the bend and the bead! This is where the wire will coil.

Now, this may look the same as the previous image, but it’s not. Both the plier (these are the round nosed pliers) and the position on the wire is different. This is an important step – move the pliers from below the bend (image above) to the top of the bend (image to left)
This next bit isn’t tricky, but you do need to pay attention! You’ll be making a loop up and around the round nose pliers, but then you need to move the position of the pliers in order to complete the loop. Start from previous step above, and hold the pliers parallel to your chest (with plier arms stacked vertically)
Image A: wire comes up and around the top of the pliers to form a loop
Image B: do a 90 degree plier shift (keeping the wire in the same position). Think of the pliers as having 2 arms, rotate the bottom arm from a 6 o’clock position in image 1 to a 9 o’clock position in image 2) Notice in image B, the bottom arm is now on the left. This enables you to complete the loop.
Image C: complete the loop around the plier ‘arm’

Image A

Image B

Image C

This is what it should look like off the pliers.

If you are wire wrapping onto something, this is where you attach it. Carefully slip the chain (or what ever you are attaching to) along the straight wire, and into the wire loop you just made. It should look like the picture to the left.


Pick up the chain nosed pliers again, grasp the loop, then using another pair of pliers (I like the bent nosed ones best for this) wind the end around the stem. The closer your loops, the neater your end product will look!
When you reach the bottom of the wrapping space, use the clippers to trim any left over wire.

Using either the chain nose or the bent nose pliers, use the tip to tuck the end in – you don’t want to get poked!

Voila! A wire-wrapped bead.
Once you have all your beads wrapped, slip them on jump rings, and slide them onto the leather in whatever configuration you desire!